
How to do a Virtual Photoshoot:

Sounds kind of wild, right? Taking photos virtually feels like a futuristic thing that we aren’t quite ready for. But it’s happening all around the world!
When my long time friends and clients, Erin and Elana, discovered they would be expecting a baby boy in the midst of a stay at home order (cause hello, pandemic), I knew we had to find a creative way to take their maternity photos. This is such a sacred and special time for these soon-to-be mamas and I couldn’t stand not providing something tangible for them to remember this season of life by. I started researching and quickly found an article showing the step by step process for taking photos virtually through Facetime. I was floored. This was a real option?
Although I can no longer find the original article I referenced for step by step instructions, this one is super helpful! I’m also going to recap my process below and share a few of the final photos. 🙂
Let’s get into the nitty gritty details. From a thirty thousand foot view, you’ll be taking “Live Photos” during a Facetime call. That’s it! But there are a few settings that need to be turned on before starting.
1. Before the Shoot
- Decide if an extra person will be holding the phone or if a tripod will be needed. I used this one from Amazon and shipped it to my couple a week before our shoot.
- Choose the best quality phone. Whoever will be modeling for the camera (or in this case, the iPhone), they will need the best quality iPhone they have. The camera on an iPhone is typically better than an iPad or laptop. Ideally, they’d have one of the newer models, but use whatever ya got baby!
2. Pre Photoshoot Settings
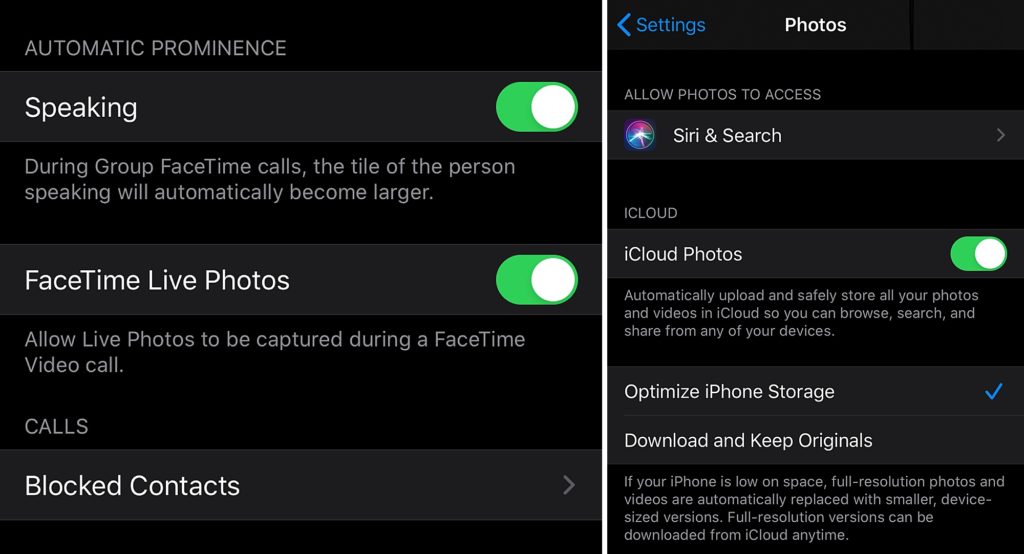
There are a handful of settings to double-check before a virtual photoshoot. All of these settings need to be turned on for both parties Facetiming.
- Upgrade to iOS 11 or later.
- Enable Facetime Live Photos. Go to Settings, Facetime, and scroll down. Make sure the “Facetime Live Photos” option is turned on.
- Enable save photos to iCloud. Go to Settings, Photos. Near the top is “iCloud Photos,” make sure this is turned on.
- If any of these settings were changed, restart the phone.
3. Preparation
Before Facetiming, here are a few tips and tricks to ensure the best quality, best light, and overall best experience!
- If possible, Facetime prior to the shoot to discuss the specific locations you’ll use and what time of day the shoot will take place. For my session with Erin and Elana, they opted for taking photos in their home. Prior to the shoot, Elana kept an eye on their nursery and kitchen for when it received the most natural light. We ended up taking photos from about 1pm – 3pm.
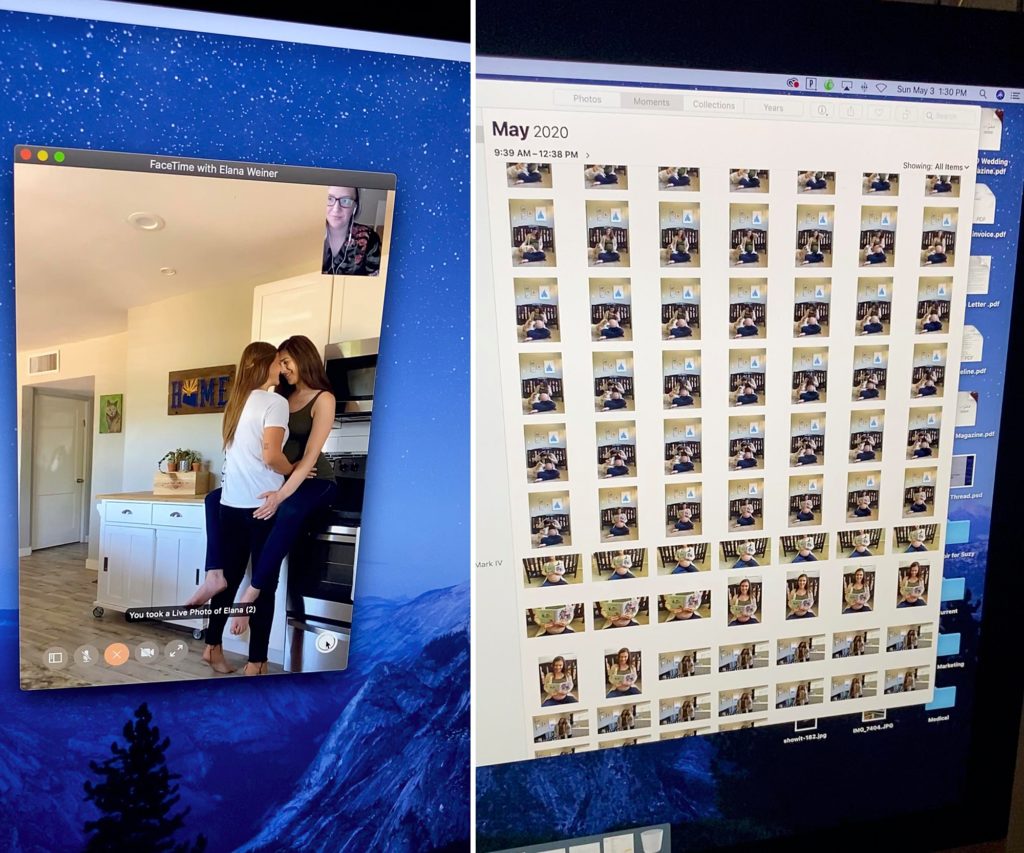
- When Facetiming on my iMac, I noticed the camera needed a moment to refocus every few photos. Because I had iPhoto open on my computer, I kept an eye on the photos and made sure they were in focus and turning out well.
- Plan for extra time. Virtual sessions are slower paced (in my opinion) and need more attention to detail. iPhone photos are smaller file sizes than on a camera and can be tricky to crop. I highly recommend taking the time to ensure the camera is straight and at the best angle. It’s worth it!
4. Facetime!
It’s time to Facetime! For my session with Erin and Elana, I personally chose to Facetime from my iMac. In the Facetime window (on a computer or iPhone), there’s a small white button, that’s the shutter! As the photographer, I coached Erin and Elana in posing and told them exactly what to do with their hands. 😉 I know them well and we have become friends after I photographed their wedding, so it was easy and comfortable to pose and guide them.
Behind the Scenes: I had iPhoto open side by side with Facetime on my computer so that I could see the photos in real-time. It does take the photos a few seconds to load, but I could peek at them and adjust posing or lighting as needed. Here’s a peek at what it looks like side by side!
5. After the Photoshoot
After the photoshoot, the photos will be loaded into iPhoto. From there, I recommended dragging them into their own folder and saving multiple backups outside of iPhoto. Then the photos can be culled, edited, and delivered just like any other photos.
That’s what it takes for a virtual photoshoot! I hope this helps and would love to see virtual photos you take!
If you’d like to see more photos from my virtual photoshoot with Erin and Elana, take a look here!
